
Keeping your home safe with Ring security cameras, like the Floodlight Camera and Spotlight Camera, is important. Sometimes, these cameras might have problems, or you might need to move them or give them to someone else. When this happens, resetting the camera can help. This guide will show you how to reset your Ring camera, explain what happens when you do, and help you fix common issues.
Why You Might Need to Reset Your Ring Security Camera
Resetting your Ring camera is a big step that can fix many problems. It makes your camera go back to how it was when you first took it out of the box.
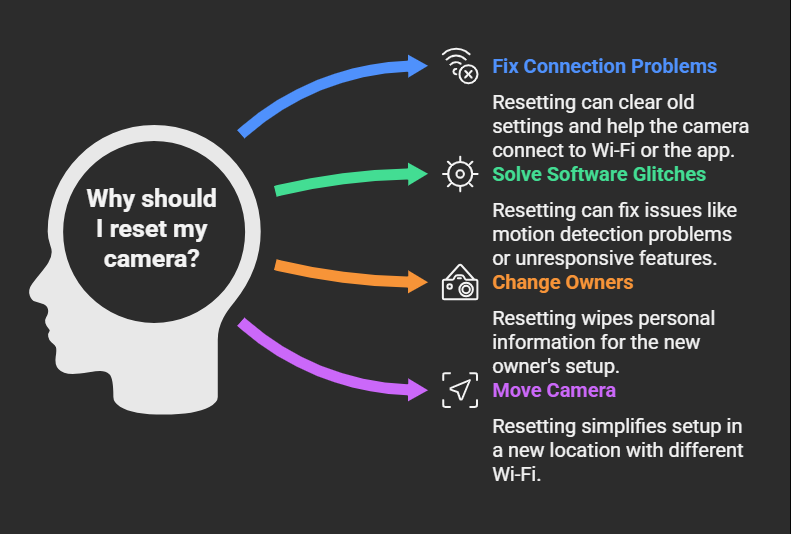
Resetting is often suggested for these problems because it’s a strong way to fix deep issues that a simple restart can’t. It’s a key step to get your camera working like new again.
What Happens When You Factory Reset Your Ring Camera
A “factory reset” (also called a “hard reset”) makes your Ring camera go back to its original settings, just like when it was made. This is different from just turning it off and on again.
Here’s what happens:
- All Your Settings Are Erased: This includes your Wi-Fi password, motion detection areas, privacy settings, and any other changes you made.The camera will act like it’s brand new.
- Software Gets a Fresh Start: A hard reset often downloads a clean version of the camera’s software. This can fix any “bugs” or problems from old software. For example, with some Ring Indoor Cameras, a 30-second reset always starts a software download, which can take a few minutes. This means the reset isn’t just clearing settings; it’s also refreshing the camera’s main software.
- You Need to Set It Up Again: After a factory reset, your camera won’t be connected to your old Wi-Fi or account. You’ll need to set it up again using the Ring app, just like you did the first time.
It’s important to know the difference between a factory reset and a simple reboot (or power cycle). A reboot just restarts the camera without erasing any settings. You can do this in the Ring app or by unplugging the camera for a moment. A reboot is good for small, temporary problems like bad sound or video. A factory reset is for bigger, more stubborn problems because it completely wipes everything and starts fresh. So, try a simple reboot first for small issues, and save the factory reset for bigger ones.
How to Hard Reset Your Ring Security Camera: Step-by-Step
How you reset your Ring camera depends on the model, especially where the reset button is and how long you need to hold it. It’s important to follow the right steps for your specific camera.
Before You Reset: Quick Check
Before you start, make sure:
- Power is On: Your camera needs power. If it uses a battery, make sure it’s fully charged. If it’s wired, check that it’s plugged in correctly. If there’s not enough power, the reset won’t work.
- Find the Reset Button: The button is in a different spot on different cameras.
How to Reset Different Ring Camera Models
The time you hold the reset button is very important and changes by camera model. For example, while some say 30 seconds for Floodlight and Spotlight cameras, official Ring guides might say less for the Spotlight Cam. Always check the specific instructions for your model.
Here’s a quick guide for different Ring cameras and doorbells:
Ring Camera Reset Instructions
Floodlight Camera
- Reset Button Location: On top of the camera
- Hold Time: 30 seconds
- What to Look For: Release when the light blinks
Spotlight Camera
- Reset Button Location: On top of the device
- Hold Time: 20 seconds
- What to Look For: Release when the light on the bottom flashes
Indoor Camera
- Reset Button Location: On top of the camera
- Hold Time: 30 seconds
- What to Look For: Release when the light blinks or you hear a beep
Stick Up Cam
- Reset Button Location: On the back (orange button)
- Hold Time: 15 seconds
- What to Look For: Release when the light starts flashing
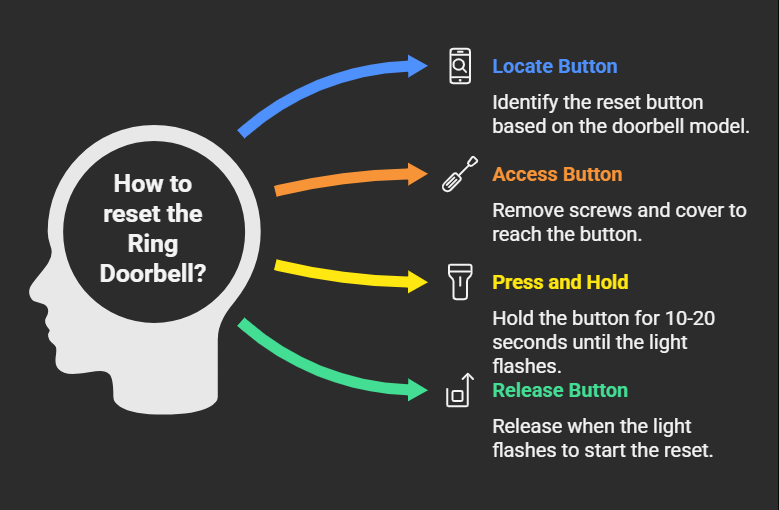
Video Doorbells (General)
- Reset Button Location: Varies (often an orange setup button; may require removing the front cover)
- Hold Time: 10-20 seconds
- What to Look For: Light or sound confirmation (depends on model)
Detailed Steps for Specific Models:
- Ring Floodlight Camera:
- Find the Button: Look for the small reset button on the very top of the camera.
- Press and Hold: Push and hold this button down for 30 seconds.
- Watch the Light: When you let go, the camera’s light should blink or flash. This means it’s restarting and going back to its original settings.
- Ring Spotlight Camera:
- Find the Button: The setup button is on the top of the device.
- Press and Hold: Hold this button down for 20 seconds.
- Watch the Light: After you let go, the light on the bottom of the camera should flash, showing it’s restarting.
- Ring Indoor Camera:
- Push and hold the top reset button for 30 seconds.
- After you let go, the camera should be ready to set up again. You might see a flashing light or hear a beep.
- Ring Stick Up Cam:
- Find the orange reset button on the back of the camera.
- Push and hold this button for at least 15 seconds.
- Let go when the light on the camera starts to flash.
- Ring Video Doorbells (General):
What to Do After Resetting: Setting Up Again and Account Stuff
Resetting the camera is just the first part. You also need to connect it again and manage its link to your Ring account. This is important for it to work and to keep your information private.
Connecting Your Camera to Wi-Fi and the Ring App Again
After a physical reset, your camera will be ready to connect to a network.
- Start Setup: Open the Ring app on your phone or tablet. Choose “Set Up a Device” and follow the steps on the screen. You’ll usually scan a QR code or barcode found on the camera or its box.
- Best Place for Setup: During this setup, keep your phone and the Ring camera close to your Wi-Fi router. This helps get a strong connection, which is extra important because a hard reset often makes the camera download new software. This download makes sure your camera has the latest, clean software and can take a few minutes. Don’t skip any updates and let the app finish everything on its own.
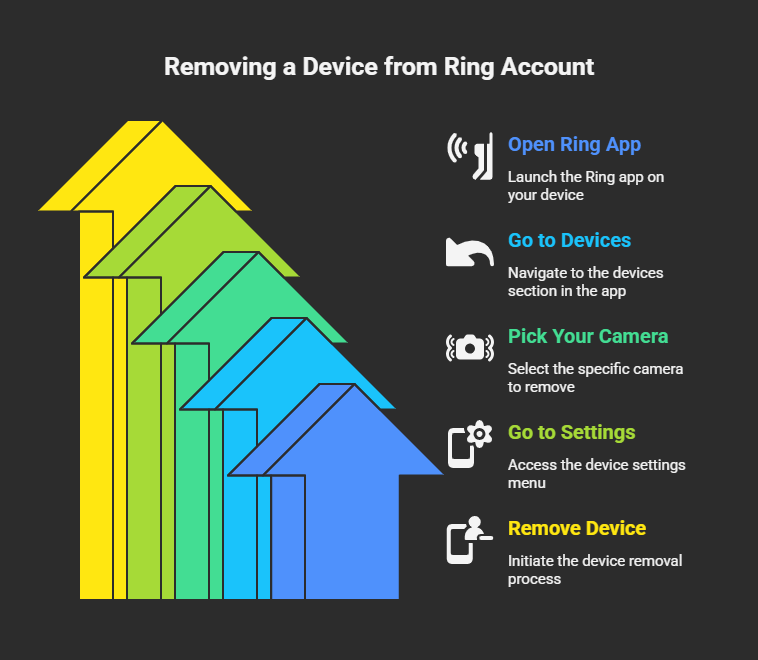
Removing Your Device from the Ring App (Very Important for New Owners)
Many people think that just resetting the camera physically is enough to give it to a new owner. But it’s not! A physical reset only clears the camera’s settings; it doesn’t remove it from your Ring account. This is super important for privacy and so the new owner can use it. Ring says that just canceling your subscription, unplugging the camera, or deleting the app won’t remove ownership; you must remove it inside the Ring app.
What Happens to Your Videos (Privacy)
When you remove a device from the Ring app, you usually get an option to delete or keep your old video recordings from that camera.
- Best for Privacy: If you’re selling or giving the camera away, it’s a good idea to delete all the videos. This protects your privacy and stops the new owner from seeing your old footage.
- Video Deletion: Remember, removing a device from the app will delete all its data and videos. So, if there are any videos you want to keep, download them before you remove the device.
This two-step process (physical reset then app removal) shows how Ring keeps track of who owns a device and protects your privacy. Even if you reset the camera, it stays linked to your account until you remove it in the app.
Fixing Common Problems During or After Reset
Even after a factory reset, you might still have problems. Fixing these issues means looking at more than just the reset itself.
Power and Battery Issues
Your Ring device needs enough power to work, reset, or set up.
- Enough Power: For battery cameras, make sure the battery is fully charged before you reset or set up. For wired cameras, check that the power source is steady and the wires are connected well.
- Battery Draining Fast: If your battery dies quickly, it could be from too many motion alerts, a weak Wi-Fi signal making the camera work harder, or an old battery. You can make the battery last longer by changing motion settings, adjusting motion zones, or moving the camera away from busy areas. Ring batteries are designed to stop charging before 100% to protect them, but managing motion settings and Wi-Fi helps a lot.
- Plug It In Firmly: For some cameras, like the Indoor Cam, make sure the power plug is pushed in all the way until you hear a “click.” This can fix power problems.
Wi-Fi Connection Problems
A strong Wi-Fi connection is key for your Ring camera to work well. Bad Wi-Fi is a common reason for cameras not responding and batteries draining fast.

These Wi-Fi tips can help your camera stay connected and reduce the need for frequent troubleshooting or resets.
App Problems
Sometimes, issues come from the Ring app itself or your phone/tablet.
- Update App and Phone: Make sure both the Ring app and your phone’s software are up to date. This can fix bugs.
- Restart Phone: Simply turning your phone or tablet off for 30 seconds and then back on can clear temporary software problems.
- App Permissions: Check that the Ring app has all the necessary permissions on your phone, especially for things like the microphone.
- VPNs: If you use a VPN on your phone, try turning it off temporarily, as it can sometimes cause issues with the Ring app.
When a Reset Doesn’t Help
Even after trying all these steps and resetting, some cameras, especially certain Stick Up Cams, might still not work. Users have reported cameras that won’t reset or stay unresponsive, becoming “paper weights”.This means some problems can’t be fixed by you and might be due to a hardware issue.
If your camera is still not working, especially if it’s completely unresponsive, you should contact Ring Customer Support. They can help you figure out the problem, guide you through more advanced fixes, or arrange for a replacement if your camera is still under warranty.4 You can usually reach Ring support by phone or private message on Facebook, as they don’t typically offer email support for troubleshooting.
Changing Wi-Fi Without a Full Reset
If you just change your home Wi-Fi network or password, and your Ring camera is otherwise working, you don’t always need to do a full factory reset. A full reset wipes everything and takes more time.
Ring has an easier way to update your Wi-Fi details without a complete hard reset. This saves you time and effort.
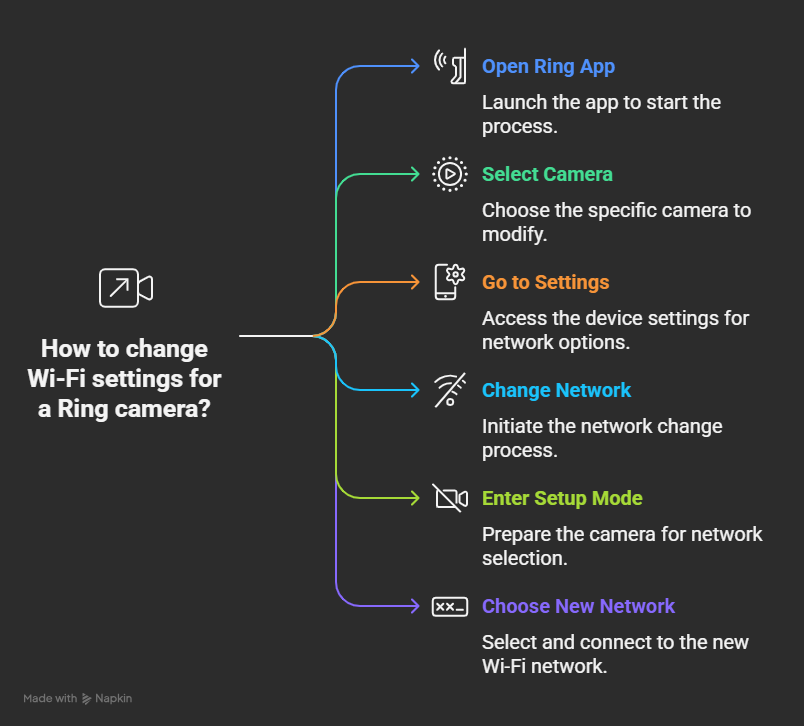
This method lets you update your camera’s Wi-Fi connection easily, keeping all your other settings as they are.
Getting the Most Out of Your Ring Camera
Knowing how to manage and fix problems with your Ring security cameras is key to having a good home security system. Being able to factory reset your camera is a powerful tool for fixing many issues, and it’s a must-do when giving the camera to someone else.
Here are the main things to remember for your Ring camera:
- Understand Resetting: A factory reset clears all settings and often updates the camera’s software, so you’ll need to set it up again.
- Follow Specific Steps: Always use the exact instructions for your camera model for the reset button location and how long to hold it.
- Properly Transfer Ownership: For privacy and so the new owner can use it, always remove the device from the Ring app after physically resetting it when changing owners.
- Good Wi-Fi is Key: Make sure your Wi-Fi signal is strong by placing your router well, using the right Wi-Fi frequency (like 2.4GHz), and restarting your network equipment regularly.
- Manage Power: Ensure your cameras always have enough power and try to fix things that make batteries drain fast.
- Try Easy Fixes First: For small problems, try simple restarts or changing Wi-Fi in the app before doing a full factory reset.
- When to Call for Help: If problems continue, especially if the camera is completely dead, it’s best to contact Ring Customer Support.
By following these tips, you can keep your Ring security cameras working well and enjoy a safer, smoother smart home experience.if you want Top reviewed ring security camera,check it.