
If your DVR (Digital Video Recorder) keeps rebooting frequently, it can be frustrating and may disrupt your security system’s performance. While DVRs are designed to auto-reboot once or twice a day to refresh the system and maintain functionality, frequent or unexpected reboots signal a problem. Common reasons include power supply issues, overheating, failing hard drives, outdated or corrupted firmware, or internal hardware malfunctions. This issue is more common than you might think, with around 20-30% of DVR users experiencing it at some point. If your DVR is rebooting excessively, it’s crucial to address the problem promptly. Begin by checking the power source, making sure proper ventilation to avoid overheating, and updating the software. If these steps don’t resolve the issue, contacting the DVR manufacturer’s support team is the next step. They might resolve minor issues quickly, but hardware-related problems could take a few days to fix. Watch for signs like missing footage, interrupted recordings, or an unresponsive system after rebooting to determine if your DVR has a significant problem. Regular maintenance, timely updates, and proper setup can help reduce the chances of frequent reboots and ensure reliable performance.
Common Issues with DVR Auto-Rebooting
- Power Supply Problems
- Overheating
- Hard Drive Failures
- Firmware or Software Glitches
- Faulty Internal Components
- Incompatible Devices
- Network Issues
- Factory Defects
- User-Configured Errors
Identifying The Problem And Solve: Step-by-Step
Power Supply Issues
Experiencing frequent reboots with your DVR? One common cause can be power supply issues. Make sure your system receives a stable power supply is crucial. Let’s dive into some steps you can take to identify and resolve these issues.
Inspecting Power Cables
Start by checking the power cables. Look for any visible damage such as cuts, frays, or exposed wires. Damaged cables can cause intermittent power loss, leading to reboots.
- Unplug the cables and inspect them closely.
- Replace any damaged cables immediately.
- Make sure cables are securely connected to both the DVR and the power source.
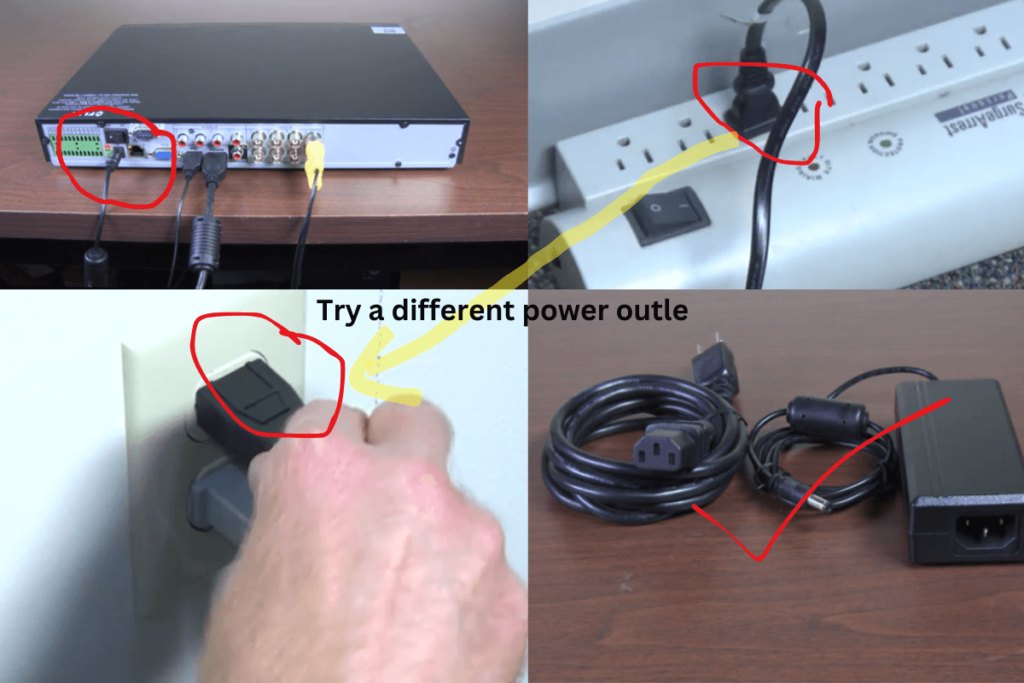
Testing The Power Adapter
Next, test the power adapter. A faulty adapter can lead to unstable power supply.
- Disconnect the power adapter from the DVR.
- Plug the adapter into a known working device to check its functionality.
- If the device does not power on, consider replacing the power adapter.
Make sure the new adapter matches the voltage and current specifications of your DVR.
If you are facing the same problem after changing the power supply, then disconnect each camera cable from the DVR and check again whether the DVR Auto reboot has changed or not? If you do not see any change, then disconnect the Mouse and monitor cables from the DVR and check.

If you follow these steps, you can identify and resolve common issues,
Hard Drive Problems
If your DVR reboots often, the hard drive might be the problem. Hard drives store all your recordings. If they fail, your device can crash and reboot. Let’s explore how to check and replace a faulty hard drive.
Checking Hard Drive Status
First, make sure the hard drive is working right. Follow these steps:
- Access the DVR menu.
- Go to the system settings.
- Find the storage or hard drive section.
- Check the hard drive status.
If the status shows errors or bad sectors, the hard drive is failing. You need to replace it soon to avoid losing data.
Replacing A Faulty Hard Drive
Replacing a hard drive is easy. Follow these steps:
- Turn off the DVR.
- Unplug the power cable.
- Open the device case with a screwdriver.
- Locate the hard drive inside.
- Disconnect the cables from the old hard drive.
- Remove the screws holding the hard drive.
- Take out the old hard drive.
- Insert the new hard drive in the same spot.
- Secure it with screws.
- Reconnect the cables.
- Close the device case.
- Plug in the power cable.
- Turn on the DVR.
After replacing, format the new hard drive in the device settings. This ensures it works well with your system. A new hard drive should solve the rebooting issue.
Firmware Updates
Experiencing issues with your DVR constantly rebooting can be frustrating. One common cause is outdated firmware. Making sure your device has the latest firmware can solve many problems, including frequent reboots. In this section, we’ll explore how to check and update your firmware.
Checking Firmware Version
Before updating, you need to know your current firmware version. Follow these steps:
- Access your DVR main menu.
- Navigate to the System Information or About section.
- Locate the Firmware Version information.
Note down the version number. This helps you ensure you’re updating to a newer version.
Updating Firmware
Updating the firmware is straightforward. Follow these steps to update your DVR firmware:
- Visit the manufacturer’s website.
- Search for your device model.
- Download the latest firmware file.
- Transfer the firmware file to a USB drive.
- Insert the USB drive into the DVR.
- Navigate to the Firmware Update section in the menu.
- Select Update Firmware and follow the on-screen instructions.
Ensure the device is not turned off during the update process. Once completed, your DVR should run more smoothly.
Network Connectivity
Network connectivity issues can cause a DVR to reboot. Making sure stable network connectivity is crucial for the smooth functioning of your device. Below are steps to inspect and test your network connectivity.
Inspecting Network Cables
Start by checking all the network cables connected to your DVR. A loose or damaged cable can disrupt the connection.
- Inspect the cables for any visible signs of wear or damage.
- Ensure each cable is securely plugged into its respective port.
- Try using a different network cable to rule out cable issues.
Replacing old or damaged cables can often resolve connectivity problems. Always use high-quality cables to maintain a stable connection.
Testing Internet Connection
Testing the internet connection helps ensure that the DVR is receiving a stable network signal.
- Connect another device, like a laptop, to the same network port.
- Check if the laptop can access the internet without issues.
- If the laptop experiences problems, reset your router.
- Run a speed test to check for sufficient bandwidth.
If your internet connection is unstable, contact your ISP. Sometimes, upgrading your internet plan can help provide a stable connection for your DVR.
By making sure your network cables and internet connection are in good condition, you can prevent your DVR from rebooting unexpectedly.
Temperature And Ventilation
Experiencing frequent reboots with your DVR can be frustrating. One common cause is temperature and ventilation.
your device stays cool and well-ventilated can significantly reduce reboot issues.
Making sure Proper Ventilation
A DVR needs adequate airflow to function properly. Blocked vents can cause overheating, leading to frequent reboots. Here’s how to ensure proper ventilation:
- Place the device in an open area, not inside a closed cabinet.
- Keep at least 2 inches of space around the device for airflow.
- Avoid stacking other electronics on top of the DVR.
- Regularly clean the vents to remove dust and debris.
Checking Device Temperature
Monitoring the device temperature can help you identify if overheating is the issue. Follow these steps to check the temperature:
- Check the device’s built-in temperature sensor. Refer to the manual for instructions.
- Use an external thermometer to measure the temperature near the vents.
- If the temperature exceeds the recommended range, consider additional cooling solutions.
High temperatures can damage internal components. Keep the device in a cool environment and make sure it has proper airflow. This will help maintain its longevity and performance.
| Action | Description |
|---|---|
| Open Area Placement | Ensures airflow and reduces heat buildup. |
| Spacing | Keep at least 2 inches around the device. |
| Regular Cleaning | Prevents dust from blocking vents. |
| Temperature Monitoring | Identifies if the device is overheating. |
Resetting The Device
When your DVR keeps rebooting, resetting the device can often solve the problem. Resetting can clear glitches and restore the device to its default state. Here are two ways to reset your DVR.
Performing A Soft Reset
Sometimes a simple soft reset can fix the issue. Follow these steps:
- Turn off the DVR by pressing the power button.
- Unplug the power cable from the wall socket.
- Wait for about 10 seconds.
- Plug the power cable back into the wall socket.
- Turn on the device by pressing the power button.
This method often clears minor software issues without affecting your saved settings or recordings.
Executing A Factory Reset
If the soft reset does not work, a factory reset might be necessary. This will erase all your settings and recordings, so use it as a last resort.
- Locate the reset button on your DVR. It is usually a small, recessed button.
- Use a paperclip or pin to press and hold the reset button.
- Keep holding the button for about 10-15 seconds until the device restarts.
- Release the reset button once the device begins to restart.
The device will now return to its original factory settings. You will need to reconfigure your settings.
Seeking Professional Help
Sometimes, despite your best efforts, fixing a DVR that reboots can be challenging. At this point, seeking professional help is wise. Technicians can diagnose and resolve issues quickly, saving you time and frustration.
When To Call A Technician
- Persistent Rebooting: If your device keeps rebooting, it may indicate a deeper issue.
- Complex Errors: Error codes or messages can be hard to understand.
- Software Updates: Updating firmware or software might need expert handling.
- Hardware Problems: Faulty hardware components require professional repair.
Finding Reliable Support
Finding a reliable technician is key. Look for certified professionals with good reviews. Online platforms and local directories can help you find trustworthy service providers.
| Criteria | Description |
|---|---|
| Certifications | Ensure the technician has relevant certifications. |
| Experience | Look for someone with experience in DVR systems. |
| Reviews | Read reviews and testimonials from previous clients. |
| Cost | Compare prices to avoid overcharging. |
Contacting the manufacturer’s customer support is another good option. They often have specialized knowledge about their products.
Frequently Asked Questions
Why Does My DVR Keep Rebooting?
Your DVR may be rebooting due to power issues, overheating, or firmware problems. Check for loose connections and ensure proper ventilation. Updating the firmware can also help.
How Can I Stop My DVR From Rebooting?
To stop your DVR from rebooting, ensure it’s well-ventilated and connected to a stable power source. Update the firmware regularly and check for hardware issues.
What Causes DVR To Reboot Randomly?
A DVR may reboot randomly due to overheating, power supply problems, or outdated firmware. Ensure good ventilation and check for power issues. Updating the firmware can help.
Can Overheating Cause DVR To Reboot?
Yes, overheating can cause a DVR to reboot frequently. Ensure proper ventilation and avoid placing it in confined spaces. Consider using cooling fans.
Conclusion
Fixing a DVR that reboots can seem tricky. Follow the steps carefully. Start with a power cycle. Check all connections. Update firmware if needed. Ensure proper cooling. Replace faulty hardware. These steps often resolve issues. If problems persist, seek professional help.
A stable DVR enhances your security system. Keep your system running smoothly. Regular maintenance is key. Happy troubleshooting!